The use of it is necessitated by our finally ditching our very unreliable internet service here at home. So now we only have our new Samsung Galaxy 6 Edge phone as a hot spot, and unfortunately, the signal is weak in this location, even though the phone and hotspot have worked just fine everywhere else we have tried it.
Many new things have happened, including a long overdue 2-1/2 week trip to Indiana, the lateness of which has also affected our choice of domicile once we leave here. But in an attempt to try to keep progress and events in the proper order, we will bring you up to date on the earliest things first, and chronologically, we are not done with the trailer yet!
At the last post, we didn’t even have the hardware on the cabinets yet, but that has now been done, except for something to keep the drawers and pantries from sliding out. I am still looking for a “desk type” lock, for which a hole must be drilled through the drawer front, and a tab on the back of the lock rotates to grab the back side of the cabinet frame…only I don’t want them with keys. I just want that type of lock with a handle on the front, similar to what is commonly used on RV utility compartments…only longer.
Below you can see the kitchen cabinet unit with the left pantry out. I was still working on the plumbing behind it at this point.
 |
| Kitchen cabinet with left pantry out. |
The problem with either one is that they allow the drawer to open about 3 inches before it is stopped. In essence, that gives the drawer a “running start” to build up momentum before hitting the stopping point. I’m just afraid that bouncing through an emergency turn could provide enough momentum to cause these “better” child-proof locks to fail. After all, they are meant for stationary homes, not moving vehicles.
On the upper cabinets, the supports are now installed to hold the doors in the open position.
 |
| Upper cabinet showing door support. |
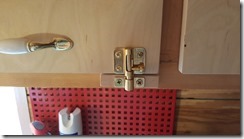 |
| Upper cabinet with slide-bolt hardware. |
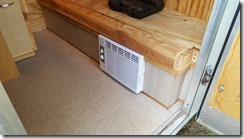 |
| Paneling facing added to front of couch. |
Another inside project was to get the flip-up counter extension/table mounted. This little extension will serve as a table for the couch, or as extra work space for the kitchen counter. Here it is shown in the “down” position…
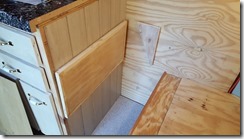 |
| Extension table in down position. |
And in the “up” position…
 |
| Extension table in up position. |
The portable table for use on tripod legs was actually ordered with the wrong type of post base…my fault. It seems boats use a 2-inch straight table post, whereas RVs use a 2-1/4-inch tapered post. Fixing that problem required some ingenuity…and a table saw.
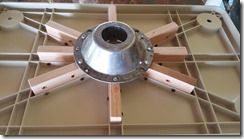
This “cheapy” molded plastic top fortunately had a lot of support arms molded into it on the underside. I simply cut wooden strips that fit snugly into the grooves.
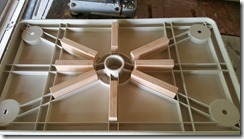 |
| Portable table bottom showing added cleats. |
In the next picture, you will notice that I screwed those strips to the table top from the sides. Due to the close proximity of the grooves, I had to drill clearance holes in some, through which the tip of the screwdriver could be inserted, to reach the screws on the other side. Then I drilled some extra holes in a surplus table base left from another remodeling project, so that the holes would line up with the new cleats attached to the table. Four screws at 90 degrees of the circumference might have been enough…but I added four more.
 |
| Portable table bottom with post cup added. |
For the posts, I only had two on hand that were the proper length, but unfortunately, the old table that they were on had been left on the rear patio too long. It was under a roof, but the humidity and rain had gotten to them, and rusted through the chrome finish. I had to use a rotary wire brush on the electric drill to clean the surface rust off, and then I hung them up and gave them a couple coats of spray primer, and then a couple coats of some flat black Rust-Oleum spray.
 |
| Table posts hanging for spray painting. |
As an old contractor employer used to tell me…”It’s good enough for who it’s for”…and works great for our immediate needs. The second table leg will go into the van, for another table there.
Eventually, we will get a regular RV table for the trailer, and this cheaper one will go in the van, to replace the small round “cocktail” table that is currently there.
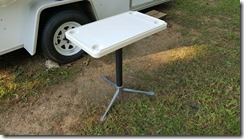 |
| Finished portable table on tripod legs. |
For now, we used this table along the side-wall, where the piano will eventually be, and put in some Samsonite folding chairs. The table and legs stores in the left side of the closet when traveling, and the chairs lay on the front bunk, folded inside an old quilt. We realize that’s not very secure, but they never moved in over 1200 miles of travel…so far. When we put the piano into the trailer, anything loose like that will be secured in the van.
Other small projects included a new outside LED patio light. This one changes from bright white to a yellow bug light, just by hitting the “off” switch for a second and then back “on” again.
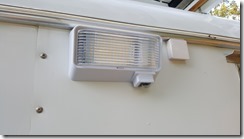 |
| New LED patio light. |
We also installed a switch for the patio light on the end of the inside cabinet by the door, so we can turn it on from inside.
 |
| Inside switch for patio light. |
But note also, that it has a switch on the bottom of the light as well. If we leave the inside switch on, and then turn the outside switch off before we leave, we can then turn the light on from the outside after we get home after dark. This will work great for finding the keyhole in the lock after dark!
Next to that, we also installed an exterior antenna jack, for when we have either our own antenna mast in place at that location (more on the antenna later), or can get cable TV from a RV park pedestal (or a satellite dish, if we should decide to go that route).
 |
| Exterior antenna jack. |
The antenna jack is conveniently located right behind the first cabinet inside the door that will serve as our “entertainment center”. Yes, we still have a VCR, as we still have a lot of tapes to convert to digital. And our little LCD TV was manufactured just before digital became mandatory, so one of those boxes is a digital converter. We have plans for a newer wall-mounted TV (something we can’t do with this existing TV) right below this cabinet, so eventually, some of the extra equipment will go. Note that there is also a plug strip right behind it, that is on a dedicated circuit straight from the power center in the rear storage compartment.
 |
| Entertainment center. |
Don’t worry, the wiring will eventually get straightened up and permanent receptacles installed when I get time. This was a “rush job” just to get us by until we can get out of here!
Of course, we mentioned the plumbing (the reason for the one pantry not being in place in the top photo). Before we could leave to go anywhere, we wanted to make sure that all the basic utilities were at least functional. In a previous post, we showed the new Camco RV sink drain trap. What we didn’t show was what it feeds into. Below is where the flexible sink drain goes down behind the wide drawer, and crosses through the divider wall into the space behind the left pantry. It has since been “rerouted” a little bit to clear the drawer better, but the idea is still the same.
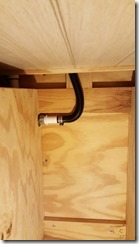 |
| Sink drain to next compartment. |
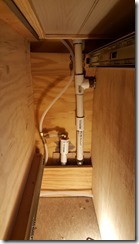
Behind the pantry is this bit of plumbing nightmare…a nightmare from having to reach through such a narrow opening to connect everything! This is why I would have preferred to have all this done inside the cabinet before it was ever installed in the trailer!
 |
| Fresh water supply left, sink drain right. |
To explain how this works…the fresh water inlet pipe is on the left, and the wastewater drain on the right. The sink drain comes through the cabinet from the right, into the “T” shown. With the outside valve open, the water gravity drains straight down and out. If we close the outside drain valve, the water is forced to back up to another “T” above the “T” that is visible, and then flows back to the portable gray water tank in the rear storage compartment.
The top “T” is still below the level of the trap under the sink, so it can’t back up there unless everything else is full or plugged up. The top “T” is installed with the side opening down, and has a removable screw-in pipe plug in the right-hand side of it, so that if anything ever does plug up, a drain snake can be run through it from either direction.
As far as venting, in short straight down runs, no vent is needed, and for the longer, sloping run to the rear gray water tank, a vent and overflow combination is installed just ahead of the tank. So far, it has been working in actual use exactly as planned.
Now for the fresh water side…in the kick space of the cabinet left of the left pantry, below the pots and pans storage, is a lift out floor…sort of a hidden compartment that is still easily accessible. The 12-volt water pump is mounted under there. The photo below shows only the relative position of the pump before the screen/filter was added to it and everything was secured. The little white fitting above the pump is the check valve to prevent city water pressure from damaging the pump. It only allows flow in one direction.
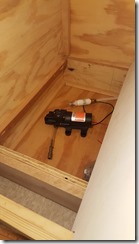 |
| Water pump under storage cabinet. |
Below is the filter/screen that should be on all RV pumps. It protects the delicate diaphragms from any debris that might be in a fresh water tank. Both pumps and filters are directional in flow, so make sure you look for arrows on each one and mount them for the proper direction of the water flow.
 |
| Screen/filter for water pump. |
In our case, the barbed fitting attaches to the inlet side of the pump, and the compression fitting attaches to plastic pressure tubing from the Reliance Hydroller water storage tank.
(Note: When using plastic tubing with compression fittings it is necessary to also use a small tube-like fitting in the end of the tubing, called a ferrule. This prevents the compression ring from collapsing the tubing and making a poor or loose fit that could leak. It is not required on copper or other metal tubings.)
(Second note: This pump actually had the wrong fittings on it for our application. These filters are made by one manufacturer to fit directly onto their brand of pump…which we did not buy. We had to “finagle” a combination of the right fittings with “O” rings behind them in order to make this work. It would have been better to buy the right pump, which would attach directly to the same brand of filter/screen. Do your research carefully before buying any of this stuff! All are available on Amazon.)
At the top of the Hydroller tank is a compression elbow to allow the tubing to transition to copper tubing to go down into the tank. This is necessary because plastic tubing would coil up inside the tank and not reach the bottom. The copper tube is straight, and can be pointed straight to the lowest portion of the tank.
I had to use the hole in the tank normally used for the vent, and drill it out to a 3/8-inch diameter. This does not hurt the sealing properties of the vent cap, should the tank need to be capped and stored…nor does it allow too much space for sloshing water out when going down the road. But for occasional water use, enough air can get sucked in, so that vacuum in the tank is not a problem. If a large amount of water is used, it could be, but that can easily be solved by taking the larger lid off, and opening the attached spigot valve slightly to allow air to enter. There is no need to remove it completely or reverse the valve. Just put the lid back on, with the reversible spigot inside the tank, and the spigot will vent just fine without sloshing out.
The water pump also has a small check valve on the other side of it, which protects the pump from city water pressure, when that is used. On our trailer, I have set it up to use water from either source. We can pump from our Hydrollers when boondocking by simply flipping the pump switch on…OR…if in a park setting with water hookups, we can connect a “city water” supply hose to the outside, and have continuous running water.
The photo below shows our outside hookups, with the drain valve on the left, and the fresh water inlet on the right. When using the on-board water pump, we simply close the valve outside to prevent the water from pumping out. The inside pump is shut off and the outside valve is opened when connecting to city water. Simple and very effective. The mounting method is simply a piece of perforated angle, with two U-bolts around the fittings, and the nylon-insert lock nuts are on the top side.
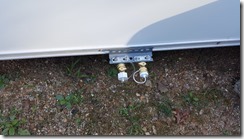 |
| Sink drain on left, fresh water inlet on right. |
Later on, I want to build an angled metal guard and attach it to the bottom of the frame in front of these valves, that will deflect any road debris that we might encounter. Better safe than sorry.
The other minor project before our first trip, was to replace the spare tire lock that came with the mounting bracket, and for which we had to put a plastic cup over to keep it from puncturing a hole in our tire cover. This is what it looked liked before putting the tire cover over it the first time.
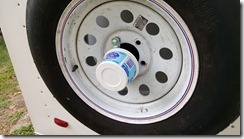 |
| Old spare tire lock covered to prevent damage to cover. |
And this is the new lock that we installed before leaving our yard…
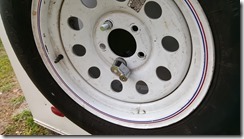 |
| New, smaller spare tire lock installed. |
Unfortunately, this only solved one issue. We discovered after we were on the road, that the “cheapy” plastic tire cover was billowing out in the middle when going down the road. At first, I thought, “No big deal, as long as it stays on”, but that was not to be. Before we reached the 500 mile mark, I saw that the cover had completely come loose on the back side, and was flapping in the wind. We ended up taking it off completely for the rest of the trip, and only putting it on for sun protection when we were staying somewhere for awhile. The wind had already done its damage to it, so a new solid cover is on our want list…like an RV-type cover with a solid plastic/fiberglass center and a metal band to go around the tire.
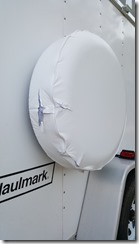 |
| Damage to spare tire cover from wind currents. |
One of the last things done, right before we spent our first and only night in the trailer before leaving, was to cut and install the cushions for the couch and beds. For the front couch, we re-used some old cushions from our 1986 Honey motorhome, from which we removed the dinette. We had to cut a little off the ends and trim some from the narrower cushions, but the seat depth was perfect.
The seat-back cushions will come down in front of the seat cushion when the couch front is pulled out to make into a bed.
In the back of the trailer, we had to take the covers off the brand new cushions that we had custom ordered for our now "on hold" minivan camper project. The largest cushion fit perfectly for width, but we had to re-cut it for the shape. Only one more of the original three cushions was needed to fill in at the narrowest part at the head of the bed. I thought we would have to do some re-gluing to combine the cushions, but as it turned out, they fit fine within their spaces without gluing anything.
So this just about covers all the little tasks that were done before our first trip. Noticeably missing is anything to do with the solar setup, but that requires a post all to itself, and will be coming up shortly.
 |
| The font couch and cushions, uncovered. |
In the back of the trailer, we had to take the covers off the brand new cushions that we had custom ordered for our now "on hold" minivan camper project. The largest cushion fit perfectly for width, but we had to re-cut it for the shape. Only one more of the original three cushions was needed to fill in at the narrowest part at the head of the bed. I thought we would have to do some re-gluing to combine the cushions, but as it turned out, they fit fine within their spaces without gluing anything.
 |
| The rear bed cushions, uncovered. |
We are currently just wrapping the cushions with a quilt and bed covers, until we see how they sleep. The rear bed is basically brand new, and of the highest quality multi-density foam that we could get, and so far, is doing fine for sleeping comfort. The front cushions, being now nearly 30 years old, are showing some signs of breaking down, plus are softer than the others to begin with. We will order new cushions from the Foam Factory (dot com) as soon as we can regroup out west. Also, once we decide that this entire project is suitable into the future for us, Sharon will have her sewing machine along, and can make professional looking covers for both beds.
So this just about covers all the little tasks that were done before our first trip. Noticeably missing is anything to do with the solar setup, but that requires a post all to itself, and will be coming up shortly.
Also coming up soon will be the full story of our first outing, complete with all the little “discoveries” regarding our actual use of the trailer to live in, as well as photos from the trip. Sharon took some photos that I do not have on my laptop yet, so as soon as she sends them over, I can write that post. We know that some of you are thinking this is an awfully small RV for two people...AND a mid-sized dog...and we will be giving you our initial impressions of actually using it.
It will get more interesting as time goes on, so if you haven’t subscribed yet, please do so. Rest assured, we don’t send out spam. The subscription process is a double opt-in type (required by law), and is ONLY for notifications of new posts. As soon as a new post goes online, you will get an automatic email telling you. That is ALL you will get. So…no need to be afraid of getting on someone else’s list. We don’t share information with anyone.
As always, let us know your thoughts in the comments below, and thanks for reading.

It looks like things are coming together very well! I know what you are saying about shifting cargo. My overheads are small enough that stuff doesn't fall out (latch has some tension) but you are wise to add the slide bolts.
ReplyDeleteI like how you are able to re-use some items, too.
Hi Brad! Yeah, we're getting there, slowly but surely. We still have a lot to do before we can get out of here for good, though. Your fishing trips look great. Nice trout! We'll try to get up there next year. I may not be great at catching, but I love eating!
DeleteI've said it before and I'll say it again in the future - AMAZING job, John. I saw the trailer when there was virtually nothing in it. Now, it's looking like a really nice RV. I know what it takes since I built up my McVansion our of a high-top conversion van. But, mine is more like a slightly sophisticated "tin can tent" and yours is like a real, well designed RV. Great job!
ReplyDelete