
When we had to make a trip to Batesville, only to find that they didn't have most of what we were after, and then the subsequent trip to Mountain Home, we also picked up the tile, tile paste, the closet doors, the counter top, and a few other smaller items.
I have since gone online and purchased the new stainless steel bar sink through an eBay vendor, and then went to Amazon, where I purchased two 6-volt, deep cycle AGM batteries.
Those should be here this week. Also, last week, my wife came home from Walmart and said they just got in some new under-counter refrigerators, and one of them was a double door in black, which is what we wanted. We immediately went back to the store and purchased it, a nice Hamilton Beach 3.1 CF unit.
We could have gotten more cubic footage by using a single door model, but the double door has a decent sized freezer compartment that will hold more than any of the others. We can get by with a small refrigerator section for our needs, and if we should need more, we still have a 40-quart and also a console sized powered cooler for any extra space. Those two units will likely stay in the van for day trips, but that's OK. They'll run on 12-volts when moving, and we can plug them into shore power back at the camp sites, or obtain power from the trailer after we get solar installed on it.
I also did some research on the electric heater for the trailer. I already know from first-hand experience that it will only take between 500 and 1000 watts to heat the trailer, and many of the space heaters are more wattage than we need, plus there's the issue with where to store it when not being used. I found a Broan wall-mount heater that provides both 500 and 1000 watt heat, fan forced. It has been ordered and should also arrive this week.
I will hook it up temporarily to provide heat in the trailer when I'm working out there, and it will be permanently mounted into the rear bulkhead wall separating the living space from the rear storage space. It will face the middle aisle where the airflow will be unobstructed, and we we won't have to store it when it's not used. But more on those items later.
Now, back to the floor in the cargo trailer.
We knew all along that we wanted to use commercial grade vinyl tile. Unlike the cheap stuff for home use, this tile is very heavy, at roughly 1/8-inch thick and the color goes all the way through it. Unlike linoleum, that only has a thin layer of color on the surface and can easily get torn up, this commercial tile is nearly indestructible. I have used it in many rental houses with great success.
Being a contractor, I have installed many types of flooring for customers, and the trend now is laminate. But what most people don't realize is that nearly all of these laminates are subject to moisture damage. If you spill something on them, they will swell up and look terrible, because they are made from wood products...usually a type of pressed sawdust. Granted, there are some that say "moisture resistant" and some that may even claim to be "moisture proof", but the latter costs a whole lot more, and too many people think they are saving money by going with something cheap...until they have to replace it.
Commerical tile, when used with a water resistant or water proof adhesive, is nearly indestructible. You can slide appliances or heavy furniture over it without damage, other than minor scratches. The drawback is that it takes an occasional waxing with liquid or paste wax to keep it looking good. It doesn't have that shiny look like so many vinyl floors have. But neither is it going to break the bank to buy it, either. We paid 64 cents per square foot, and that is nearly double of what we paid ten years ago, but still a bargain compared to other floors. And it will last "forever" for our use.
The other determining factor is that we have carpet here at home...with a German Spitz that sheds like there's no tomorrow. Pet hair in carpet is a pain to get out. and with our being in a camping atmosphere, where we are likely to get into an occasional muddy situation, a hard surface floor is the only way to go. Yes, it could be slick, also, but we will be wearing rubber-soled shoes most of the time, and can always put down some slip-resistant floor mats if necessary. Still...it will be much easier to keep the place clean.
The install...
Before any flooring is installed over any kind of wood sub-floor, a good base must be put down. For this type of tile over wood sub-floors, normally a thin plywood is used... something with a good structure (no hollow spots) and a nice finish. Luan plywood of 1/4-inch thickness is usually the best thing to use, and it's also less costly than other types of plywood.
For our use, we decided to start with a full sheet, beginning at the front edge of the right side door (photos are below). This is where the front couch will be, and the front of the couch will cover any joint at that point. The other side of the plywood will be totally under the front edge of the cabinets on the left side, so again, we won't have any seams over traffic areas. Normally when tiles crack, it is over a joint in the plywood under them, and to keep our floor looking good for many years, we didn't want plywood joints in traffic areas,
The only parts that will have a joint are between the couch and the kitchen cabinet (less than 18 inches long, and not in a walking area), and one joint across the center of the aisle in front of the closet near the bulkhead wall. Unfortunately, that is as far as the 8-foot long sheet would reach, but again, it is not in a main traffic area.
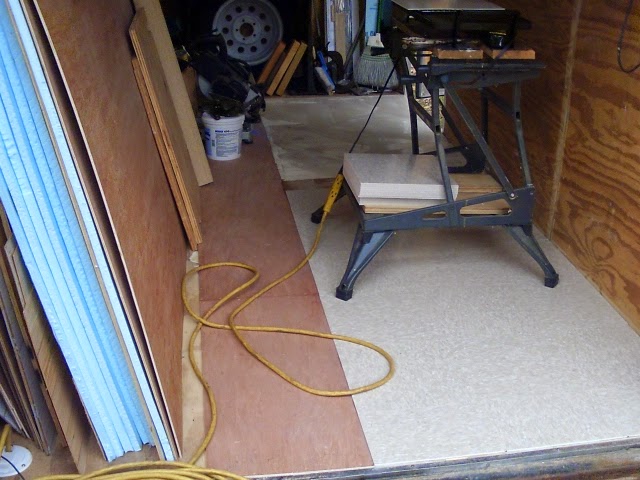
The bad part about doing a project like this at this time of the year is the weather. I have a lot of small things stored in the trailer...many sheets of plywood and insulation, a make-shift workbench full of tools, a spare tire, and many other things (like the air compressor for the staple gun) that are too big to fit on a workbench. The weather is now turning cold in the mornings, and we have occasional rain. With limited time in the clear afternoons to get something done, I don't want to spend half my time unloading the trailer and then reloading before the day is done...so I am having to work around it and shuffle it as needed.
 |
| Aluminum angle threshold at side door removed. |
So first I had to move everything over to the left side, and toward the front, to clear the right side of the floor in the trailer. I also had to remove the aluminum angle piece used as an edge protector at the side door. I was going to remove the one at the rear door, too, until I looked at it from the inside with the rear ramp door closed, and discovered that the inner plywood on the ramp sets down right on top of the threshold, and there would be no room to raise the floor under it without going to a lot of extra work. Also both ends of the aluminum angle were trapped under the vertical corner pieces of aluminum trim on both sides of the door, which might have required bending it to get it out. No thanks! I decided to run the new plywood "up to" the rear threshold piece and then cap it with another aluminum joiner strip. I'll update this post with pictures of that when I get it done.
But before I could do anything with plywood, the four tie-down rings had to be removed from the floor...not an easy job. This used to be a motorcycle trailer, so there was also a front tire hoop that had to be removed. They used stainless steel screws except where they went into framing members with sheet metal screws, but the nylon insert type locknuts on the bottom in other areas were hard to reach and hang onto. Without another helper, I clamped Vice-Grips onto the nuts under the floor, and then tried to back the screws out from the top with a drill and Phillips bit. Some came out easily, but unfortunately, the heads stripped on a couple of others, and in the end, I had to resort to a 4-foot crowbar to pry the metal plates over the screw heads. Once the plate was off, I could grab the tops of the screws with a second set of vice grips and remove the screws.
Then, the tie-down rings had been recessed part-way into the floor, so those holes had to be filled. Also, I discovered there was a rough joint between two pieces of subfloor near where the center aisle would end, so those had to be patched before I could install the Luan on the floor. All I could find in floor patching compound was a 25-pound bag (WAY more than I needed), so I resorted to a product that's been around a long time...Durham's Wood Putty. I used a small drywall trowel to spread it smooth over the holes and joints.
I also had a couple of holes in the sidewalls...one for the light switch that was removed by the side door, and one directly opposite from a gouge in the plywood wall. The joints between the plywood on the walls will be covered with batten strips where needed. Some screws may have to be backed out, counter-sunk, and then reinstalled in order to go over them. Some areas may be drywalled over with compound and tape. Everything will be primed and painted in the end.
The putty dries pretty quickly, usually within a half hour, so once it was hard enough it was time to install the Luan plywood.
Once the plywood was stapled down using my Bostitch air stapler with 3/4-inch staples, it was time to find the center. Since the width of the trailer is just under 6 feet, I knew that any cuts I had to make on the outside edges would be larger than a half tile if I started in the center.
In any tile work like this you always want to measure and plan so that you don't end up with little strips along the edge. Preferably, you want to lay it out so that you have something larger than "half-size" (or less) pieces along the edge. If that happens by using a center mark, then move the mark to 6-inches off center, and that will increase the size of the outer edge pieces of tile.
The box corner showing at the bottom of the photo above is actually the new air conditioner. It will go in the right front corner of the trailer, under the front couch and near the door. It has to be unpacked yet, and then the frame of the front couch will be built around it. Holes (with screens and filters) for rear vents will have to be cut down through the floor to pull in fresh air and exhaust warm air back outside, but I may wait to do that next spring...unless it is a case where I can't get my saber saw in there afterwards...in which case I may have to do it before anchoring the air conditioner in place.
The reason I'm not putting it in the center of the couch is simply for space saving reasons. If I center it, there will be only short storage spaces on either side of it, whereas by keeping it closer to one side it will allow longer items to be stored under the couch. Also, keeping it toward the open floor by the door makes more sense than having it blowing on our legs in the middle of the couch, or blowing against the kitchen cabinet on the left side.
But that gets into another subject, and we'll talk more about all those items as we get to them. For now, the floor is done, and now I can work inside the trailer with much smaller pieces of framing and plywood while I build the cabinets. Once the new heater arrives this week, I will set it up with some temporary wiring, and be able to provide heat in the trailer this winter.
For now, it appears we only have one more day (tomorrow) to be in 60-degree temperatures, and then it will drop to 40's and 50's, so my task for this afternoon is to get the wiring installed for the Fantastic fans, and then tomorrow, to cut the holes through the roof and get the fans and covers installed. That's what the next post will be about, so I should have that ready to read by next weekend.
Then, we'll get started on the cabinets. Until then, check out my other blog at http://HardyHandyman.blogspot.com, with photos of projects that I did around the local area here before I retired. I have many more projects to write posts for and add to that blog, but as always, I get behind because life gets in the way.
As always, I appreciate my readers taking the time to read through my often lengthy posts, and I also appreciate when you click on any product links that show up. Sometimes I get a few cents just from the clicks on the links, but when you purchase through my links, I get a slightly higher commission from some vendors (except Amazon).
Next year, when we change our address to South Dakota, I will be able to use Amazon again, but right now we are in one of those sales tax nexus law states that Amazon won't allow Associates in. This is why we often try to change the automatic links to other vendors that carry the same products, as long as the price is comparable. Every vendor we use has great customer service and delivery times, or we won't recommend them.
So thank you for reading, clicking, buying, or whatever you are doing. And if you have any questions or comments, please speak up.
But before I could do anything with plywood, the four tie-down rings had to be removed from the floor...not an easy job. This used to be a motorcycle trailer, so there was also a front tire hoop that had to be removed. They used stainless steel screws except where they went into framing members with sheet metal screws, but the nylon insert type locknuts on the bottom in other areas were hard to reach and hang onto. Without another helper, I clamped Vice-Grips onto the nuts under the floor, and then tried to back the screws out from the top with a drill and Phillips bit. Some came out easily, but unfortunately, the heads stripped on a couple of others, and in the end, I had to resort to a 4-foot crowbar to pry the metal plates over the screw heads. Once the plate was off, I could grab the tops of the screws with a second set of vice grips and remove the screws.
Then, the tie-down rings had been recessed part-way into the floor, so those holes had to be filled. Also, I discovered there was a rough joint between two pieces of subfloor near where the center aisle would end, so those had to be patched before I could install the Luan on the floor. All I could find in floor patching compound was a 25-pound bag (WAY more than I needed), so I resorted to a product that's been around a long time...Durham's Wood Putty. I used a small drywall trowel to spread it smooth over the holes and joints.
 |
| Durham's Wood Putty as filler for the holes in the floor. |
I also had a couple of holes in the sidewalls...one for the light switch that was removed by the side door, and one directly opposite from a gouge in the plywood wall. The joints between the plywood on the walls will be covered with batten strips where needed. Some screws may have to be backed out, counter-sunk, and then reinstalled in order to go over them. Some areas may be drywalled over with compound and tape. Everything will be primed and painted in the end.
 |
| The old light switch hole filled with Durham's Wood Putty. |
The putty dries pretty quickly, usually within a half hour, so once it was hard enough it was time to install the Luan plywood.
 |
| New Luan to rear door with center chalk line mark. |
Once the plywood was stapled down using my Bostitch air stapler with 3/4-inch staples, it was time to find the center. Since the width of the trailer is just under 6 feet, I knew that any cuts I had to make on the outside edges would be larger than a half tile if I started in the center.
In any tile work like this you always want to measure and plan so that you don't end up with little strips along the edge. Preferably, you want to lay it out so that you have something larger than "half-size" (or less) pieces along the edge. If that happens by using a center mark, then move the mark to 6-inches off center, and that will increase the size of the outer edge pieces of tile.
 |
| The chalk line and center pencil line marking the exact center of the floor. |
The next step was to measure the front to back distance and find the center of that. It is not necessary to make a full-width chalk line here. A simple cross line is sufficient. In this case, though, it would have resulted in less than half a tile at each end had I started the tile edge there. To compensate, I marked a pencil line on the tile at the half-way point (6 inches from the edge) and lined up that mark with the front to back center pencil mark on the floor, with the edge of the first tile on the blue chalk mark.
Of course, the portion of the floor that I had time to work with had to be pasted before the tile could be put down. Typically with most vinyl tile pastes, there is a waiting time. You are supposed to let the paste partially dry, to where it gets "tacky". To test it, you should be able to take a brown paper sack and touch it to the paste, and be able to pull it off, without any paste sticking to the paper, or vice versa. From experience, I just use my fingers to test it. If it feels sticky but none sticks to your fingers it is ready to lay tile on it.
The reason for this is two-fold. (1) you don't want the tiles to slide around after you position them, and (2) you don't want liquid paste squeezing out from between the tile after you put weight on them. If that happens, or you accidentally get paste anywhere else that it shouldn't be, a rag with some mineral spirits will usually clean things up...including your fingers and tools.
 |
| The right rear quadrant pasted, but still wet. |
Due to limited time of working with both the project and the paste, I spread the paste in only a small area with a fine-tooth spreader, from 6 inches in front of my penciled front to back center mark, and up to the blue chalk line. I also had to leave part of the floor clear to be able to stand and work in. Then it was a waiting game.
In cooler, damp weather, the paste is not going to dry as fast as it would in warm, dry weather...but it typically takes anywhere from 15 minutes to a half hour. You will see the paste start to turn from a whitish-tan color to more of a clear color as it dries.
Also, weather and temperature create another problem when working with vinyl tile. They get very stiff and brittle. If you try to cut a cold tile, it will likely break where you don't want it to. In warm sunny weather, you can normally just leave them out in the sun in a single layer, and they will soften enough to work with them. But in colder weather you have to get creative and come up with a way to heat them. In a house, or even a RV, you can turn on the oven to about 150 degrees and lay them on the rack for a few minutes.
In my case, with no oven handy, I decided to try a teflon coated griddle from the house. I also borrowed a wire cooling rack like you set cakes on. That provided about a half-inch of air space between the tile and the griddle, to prevent any hot spots on the tile, and make for more even heating. These, I set on top of my Black & Decker Workmate folding clamp table. I have found that this device comes in handy for so many things.
Again, I set the temperature at around 150 degrees...just warm enough to not burn my fingers if I accidentally touched it, but warm enough to get the job done in a reasonable time. I found that I could actually lay two tiles at a time on it...one flat on the rack, and the other leaning partially over the rack and handle at the end. This allowed me to work with one tile while another was warming up. After cutting the first tile, I would move the other one flat on the rack and lay a new, cold tile over the handle. It took about five minutes for the tile to go from about 50 degrees to close to 100 degrees...still cool enough to pick them up and cut them with heavy duty sheet metal sheers...the recommended tool for the job.
 |
| The right rear quadrant tiled and ready to use. |
After the tile was installed on the right rear quadrant of the floor, It was time to move my Black and Decker clamp table and paste the front section. The clamp table makes a great work platform for many things, but in this case, I had the griddle setting on it, with new tile on the bottom shelf.
 |
| The front right quadrant tiled and ready to use. |
After the tile was installed on the front right quadrant of the floor I locked up the trailer and let it set for a day. Then I had to shuffle things around again, move all the extra plywood and insulation board over to the right-hand side, and then install the rest of the Luan and tile on the left side.
 |
| The main part of the trailer floor tiled, except for the front. |
It felt good to get the main part of the floor done, and again, I stopped at that point. My make-shift work bench at the front still had to be moved over to the side wall, so the last 18 inches of the front floor could be done. That was a little more difficult because of the curvature of the front of the trailer. Fortunately, I still had the cut-off piece from the ceiling to use as a template. It wasn't quite wide enough to go side to side on the entire floor, but by sliding the template around on the line, I was able to extend the line the full width. I had a little extra length on the sheet to work with, so I figured that even if I had to do some extra trimming, I could. The corners were roughly a two-inch radius, so once I had the front curvature cut, I marked the radius on the corners, and when I tried the piece in the space, it fit! All I had to do then was to mark the back edge where it met with the Luan already on the floor, cut it using an aluminum straight edge clamped to the sheet, and my circular saw, and it dropped into place perfectly!
Once stapled down, I pasted that area, waited awhile, and then installed the tile, again having to cut the radius in the corners. But the nice thing about tile work around the edges, it doesn't have to be perfect. We'll later be adding 3/4-inch cove or quarter round trim, so as long as the tile is within 3/4-inch of the wall, it's fine, and will be covered. In reality, I have about a 1/4-inch gap around the edges, so it's good to go. You never want to cut any flooring tight to the wall. It will expand from traffic and warmer temperatures and buckle.
 |
| The rounded front of the trailer, all tiled and ready to use! |
The box corner showing at the bottom of the photo above is actually the new air conditioner. It will go in the right front corner of the trailer, under the front couch and near the door. It has to be unpacked yet, and then the frame of the front couch will be built around it. Holes (with screens and filters) for rear vents will have to be cut down through the floor to pull in fresh air and exhaust warm air back outside, but I may wait to do that next spring...unless it is a case where I can't get my saber saw in there afterwards...in which case I may have to do it before anchoring the air conditioner in place.
The reason I'm not putting it in the center of the couch is simply for space saving reasons. If I center it, there will be only short storage spaces on either side of it, whereas by keeping it closer to one side it will allow longer items to be stored under the couch. Also, keeping it toward the open floor by the door makes more sense than having it blowing on our legs in the middle of the couch, or blowing against the kitchen cabinet on the left side.
But that gets into another subject, and we'll talk more about all those items as we get to them. For now, the floor is done, and now I can work inside the trailer with much smaller pieces of framing and plywood while I build the cabinets. Once the new heater arrives this week, I will set it up with some temporary wiring, and be able to provide heat in the trailer this winter.
For now, it appears we only have one more day (tomorrow) to be in 60-degree temperatures, and then it will drop to 40's and 50's, so my task for this afternoon is to get the wiring installed for the Fantastic fans, and then tomorrow, to cut the holes through the roof and get the fans and covers installed. That's what the next post will be about, so I should have that ready to read by next weekend.
Then, we'll get started on the cabinets. Until then, check out my other blog at http://HardyHandyman.blogspot.com, with photos of projects that I did around the local area here before I retired. I have many more projects to write posts for and add to that blog, but as always, I get behind because life gets in the way.
As always, I appreciate my readers taking the time to read through my often lengthy posts, and I also appreciate when you click on any product links that show up. Sometimes I get a few cents just from the clicks on the links, but when you purchase through my links, I get a slightly higher commission from some vendors (except Amazon).
Next year, when we change our address to South Dakota, I will be able to use Amazon again, but right now we are in one of those sales tax nexus law states that Amazon won't allow Associates in. This is why we often try to change the automatic links to other vendors that carry the same products, as long as the price is comparable. Every vendor we use has great customer service and delivery times, or we won't recommend them.
So thank you for reading, clicking, buying, or whatever you are doing. And if you have any questions or comments, please speak up.
No comments:
Post a Comment
We welcome conversational comments that are on topic and useful. Links to personal blogs are fine, but we will not approve comments made for the sole purpose of linking to a commercial business, and/or which have no direct relevancy to the topic of the post. Thank you.
Only those who have Google accounts may comment, as the platform has done away with the "Open ID" concept.