It's always nice to get past the hard parts of any task, and as of yesterday, I feel that I am at that point. In this post, I will show the installation of the first part of the upper cabinets around the curved front of the trailer, and then let you know about Angel's progress on his leg healing up.
In the last post, you saw the upper cabinet for the left front corner. In this post, that cabinet has been joined to the microwave cabinet, and the entire assembly attached to the wall. But before that could be done, the front upper wall cover had to be installed.
In the previous post, you saw how we used a heavy duty ratchet strap to "pre-bend" the piece of plywood to make it easier to fit into the rounded front of the trailer.
 |
| The upper front of the trailer wall with the cover in place. |
After checking out the wiring to make sure it was OK to cover it up, the curved section was set in place, held up by my handy trucker's bar. This was picked up at a truck stop somewhere in our travels for a paltry $25, and was intended to expand between sides of a truck to hold cargo in place.
We originally bought it because it looked like a very handy device to put under the very long front overhang of our truck camper, to keep it from tipping over when being used off the truck, but it has come in handy on many other occasions. I used it when installing the ceiling braces to hold them tight to the roof, and again when installing the ceiling plywood. Now it is again being used to push this plywood cover tight to the ceiling while I get a few screws started in it. In the photo above, I am already done using it, and it is simply leaning against the front wall.
I had made a few pencil marks on the wall on each side, in half-inch increments... measured from the floor (since the trailer itself is not quite setting level). Before installing screws, I checked both sides to make sure the plywood was both level and flush with the edges of the vertical sheets below it. The screws at the top and bottom of the panel will be hidden with trim when the project is all finished.
Although it will be a real pain if I should ever have to remove this panel, it "could" be done by removing the screws, including those holding the cabinets to the wall, and sliding it straight down. Hopefully, there will never be a need for that!
The next step was to prepare the ceiling. When I had installed the ceiling plywood, it was screwed into the steel roof bows, but I also stapled the edges into the blocking that I installed along both sides. That took the "crinkling" out of the edges, but also, I discovered that the blocking was shallower than the roof bows in some places, and that led to a dip on either side of the bows. Before the cabinets were hung, I had to pop those edges loose from the staples and allow it to relax. When the cabinets were hung, shims had to be inserted along those edges to pull the plywood down tight against the tops of the cabinets, to make everything look straight.
To make sure that the faces of the cabinets lined up and wouldn't get skewed by a potentially crooked ceiling, it was necessary to bond the microwave cabinet to the printer cabinet, and then lift the entire unit into place. This is the only way to be sure that they line up with each other before securing them to the ceiling. (Please excuse the fuzzy pictures from my cheap cell phone. The light was very poor in the trailer, and I could not tell how bad they were when I took them.)
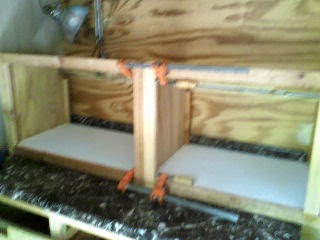 |
| The microwave cabinet being secured to the printer cabinet prior to hanging. |
This was a simple task of just joining the cabinets end to end while setting on the counter, and adding a couple of bar clamps while I pre-drilled the screw holes. I also used a counter-sink bit to make sure the heads of the screws would be hidden, and I installed them from the right-hand side, away from direct line of sight when they are hung. The screws were 2-1/2 inch all purpose screws...three of them, only in the face frame. No screws were used at the back of the dividers, so that the cabinet can conform naturally to the wall.
 |
| The microwave and printer cabinets installed on the wall. |
With that done, I manually lifted the cabinets to the ceiling and used the trucker bar to hold them in position while I installed the screws. Remember that wide piece of 3/4-inch plywood installed on the top of the microwave cabinet? That got three screws through it into the wood blocking behind the plywood ceiling. In each of the 3/4-inch vertical strips down the back of each divider wall and also along the bottoms of the cabinets, I found that the pocket hole screws worked out very well (without the "pockets") for length and ease of installation, as well as holding ability. I have to buy some 2-inch drill point screws yet, and then I will come back and add those into the steel roof bows, for additional strength.
I had originally thought of even gluing the backs and tops of the cabinets to the trailer, but decided against it. If we should ever have a need to remove these cabinets and put them in a larger trailer, they would be a bear to get off, and also destroy the walls of this trailer for resale. Screws will be enough to hold them.
 |
| The left half of the upper cabinets. |
With these cabinets in place, there is exactly 21 inches of room between the microwave cabinet and the closet wall, which is sufficient for most apartment-sized refrigerators. (They're typically about 20 inches wide.) I double-checked the width of ours, and it's actually 19 inches wide, so that leaves plenty of room for ventilation around it.
Keep in mind, these apartment-sized, household refrigerators should never be built into a cabinet with no air space around them. The condenser units have to be able to "breathe"...to allow the heat absorbed from the interior to escape to the ambient air of the room. In this case there will be space on the sides as well as the top, to allow free air flow around it...especially at the back where the compressor and cooling unit is located.
The floor of the printer cabinet, specifically inside the section where the voltage regulator for our computers will go, required custom fitting to the curvature of the front wall. It's not 100% perfect, but since all the cabinets are going to get painted anyway, it will be easy enough to apply some painter's caulking around the perimeter to really seal it up properly. We don't want little things like paper clips falling down into the cracks...not that we would ever use paper clips there. Just saying.
There may be room to add a shelf above the power regulator and still leave enough ventilation above it, but any extra shelves in any of the cabinets can be added later. For those, I will add vertical steel shelf standards with adjustable clips, so we can adjust the height of the shelves.
 |
| The floor of the power regulator cabinet. |
After that project, I decided to keep going and build the other cabinet for the right-hand front corner of the trailer. I already have about 8 of the divider/end panels already cut, so it was mainly a matter of building the the face frame and the rest of the box and adding the 3/4-inch square nailers and other supports to it. Many of the face frame pieces and other stock pieces are already cut, other than to length. With the difficult work out of the way, the rest of the upper cabinets will be completed fairly quickly. I would venture to say that I can do all the rest in a day. This one only took me about an hour.
 |
| The front right cabinet. |
Again, it required building a template to get the curvature and angle just right for the floor of the cabinet, but worked out well. The front of the trailer actually starts out about 9 degrees out of square with the side walls.
The cabinet for the front right-hand corner was very similar in shape, although the photo makes it look like a tighter radius. Maybe it was the angle from which I took the photo.
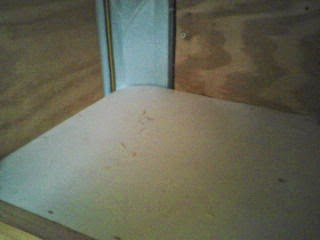 |
| The floor of the front right cabinet. |
Notice that I have not closed up the front vertical corners, nor the upper edges of the ceiling yet. What you are seeing is the blue rigid foam insulation that had to be cut in strips in order to bend around the corner. I have aluminum panning material that could be used to form into those corners. It will be stapled down both sides, after which some lattice trim will be installed to hide the sharp edges and cover the staples. That is what is used in most of these trailers, anyway. It will be primed and painted.
On the edges of the ceiling, inside the cabinets (in most places), I plan to use pieces of luan paneling, set at an angle, so as to provide a wiring chase down both sides of the trailer. The only places it will not be inside cabinets, is above the head of the rear bunk, inside the wardrobe closet, over the refrigerator, and above the entry door. Those covers will be removable, in case I ever need to get into them again. This is why there is an angled opening at the top rear of all these overhead cabinets. There will also be an angled chase down the right hand side of the closet wall, for access to the battery compartment. All of these will eventually be covered, after all the wiring is in place.
These front corners are the two worst places to deal with in this trailer project. The only other one will be at the top of the wall behind the rear bunk, but since I already have the template made for the ceiling at the front, it should be easier. Hopefully, there won't be much difference between the front of the trailer and the back, and there will only be the arch of the roof to contend with, as there is no curvature around the back of the trailer. Everything will be flat back there. Easy peasy.
In case anyone is wondering, the microwave cabinet and the printer cabinet are designed to be 15 inches out from the wall and 17 inches down from the ceiling at the front. Not only did those appliances need that much depth and height (especially the Lexmark printer), but it was also determined by the amount of headroom we would have above the couch seat. We will still have enough for our height that we won't bump our heads when seated at the couch. A front shelf will also be installed across the width of the trailer at a level even with the bottom of the cabinets. It will be about 8 inches deep at the middle point.
Also, on a trailer this small, we wanted to take advantage of creating storage space by any means we could. The cabinets along the right-hand side will be the standard 12 inches out from the wall, but we are making all of them 17 inches tall at the front. Originally, I was just going to build regular "boxes" and leave the tops open, for whatever we might want to put up there. What changed my mind was the strength and stability of such a design. It would have been totally dependent on the walls, with no means of securing the front of the cabinets to the ceiling. By making them full height to the ceiling, they can be secured to the ceiling/roof at the front edge of the cabinets, making them much more secure for bouncing down the road.
I am hoping to get by with three cabinets along the rest of the upper right side wall, each about 30-inches long, but I have to get an exact measurement yet. Before I can install those, I have to take down the temporary steel pegboard that I put up for tools. It is simply hung from the top edge of the plywood with S hooks temporarily scavenged from some rubber trucker's bungies.
 |
| My temporary pegboard work station. |
I also have to take down two other pegboards of that same size that are still in the garage, and then reinstall (with screws) two of them on the back of the rear bulkhead wall in the trailer, plus one along the right side wall in that storage compartment. These will hold other tools and help secure anything that would normally be laying loose in the back of the trailer. Rather than hooks, we'll use mostly spring clips and rings, so that tools won't bounce off when going down the road.
Once those are done, I still have the front couch and rear bunk to build yet, so I will be adding posts about those as they are built. I hope to have all the larger components built and installed by the first week of June...weather permitting.
The rain this year has been relentless, but we have no worries of getting flooded here. We are a good 200 feet above the Spring River, so everything drains downhill from here. We can see on the news that other areas of the country are not so lucky, and our hearts go out to those who have lost property or loved ones in the devastating floods.
Yesterday, the phone line excavating crew finally showed up to bury a permanent line to replace the one that got chopped up during our septic system installation of a year ago last winter! We have been relying on a thin, orange temporary line strung on top of the ground since then, which also got cut by our new lawn crew, and had to be replaced!
But as always, they have created new work for me. Even though they used a vibrator trencher, which requires very little backfilling, the wet ground almost got their machine stuck, and raking it back level again never seems to happen (by them), even in dry weather. I'll have to get out there with a landscaping rake and flatten it out after the mud dries up.
Now, as far as Angel, I noticed when I let him out yesterday, that he was actually standing on his injured leg to go potty, so that means it is slowly getting better, He is putting some weight on it, although he still tends to "hop" once in a while. He isn't up to jumping up on the bed yet, and is still a little off balance, but he doesn't show any signs of pain (no yelping), and insists on trying to do things himself (like getting in and out of the vehicles) even though we try to help him.
We have another half-week of anti-inflammatory medicine to give him, but he seems to be on the mend, although it still may take another month before he is back to normal. But we are thankful for any improvement at this point.
As always, if you have any questions or comments, please let me know. If the comment form is not showing, look for the blue link for comments directly below, and the form will open.
Thanks for reading.


